- Arrangement in PhoneStack
- Show PhoneDialog as a popup
- The Dial button
- Enter the phone number directly
- Contact search via input line
- Display of contact information
- Advanced display view
- Outside Line Access Code
- Call Forwarding and DND
- CallTabs
- Toolbar
- Keyboard navigation and hotkeys
- Problems with HighDPI Scaling
- Configuration / Assign TAPI Device
The PhoneDialog is used for status indication and control of an assigned TAPI device (phone). If you want to control multiple TAPI devices, you can create a corresponding number of phone dialogues.
Display in PhoneStack (stack-mode)
A PhoneDialog is always assigned to a PhoneStack. If several dialogs are configured, they will be placed in the stack one above the other. The order can be changed by drag and drop. You can also create multiple PhoneStacks to spread PhoneDialogs. A PhoneStack can be embedded in application window (default) or a sidebar or displayed as a popup window.
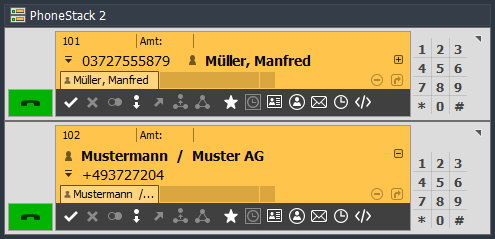
Example: Display of two PhoneDialogs in one PhoneStack.
Show PhoneDialog as popup (Popup Mode)
A PhoneDialog can be displayed as a pop-up dialog on the desktop. This is especially useful if you use the phone while the application window or the PhoneStack is hidden or minimized.
Show as pop-up manually: The PhoneDialog can be displayed as popup by clicking "View as Popup" (top right), the context menu or via a global hotkey .
Show as popup automatically: The PhoneDialog can be displayed automatically as popup on an incoming or outgoing call, if it is invisible or hidden at this time.
If the PhoneDialog automatically switched to the pop-up mode, it may automatically switched back to the stack mode when activating the (previously hidden) application window, or after the end of the telephone conversation.
Anzeige an letzter Position oder Standard-Position: In der Grundkonfiguration ist die Option "An letzter Position anzeigen" aktiv. Soll der Popup-Dialog immer an einer festgelegten Position angezeigt werden, auch wenn er zuvor an eine andere Position verschoben wurde, so können Sie die Option "An Standard-Position anzeigen" wählen. In der Grundkonfiguration ist die "Standard-Positin" so festgelegt, dass der Popup-Dialog in der oberen rechten Ecke (etwas eingerückt) auf dem Hauptmonitor angezeigt wird.
Neue "Standard-Position" festlegen: Verschieben Sie das Popup an die gewünschte Position auf dem Desktop und wählen Sie im Kontextmenü den Eintrag [Dialog Ansicht > Standard-Position speichern].
Mehrer Popups an der selben Position: Sollte die Anzeige im Popup-Modus dazu führen, dass ein anderer Popup-Dialog überdeckt wird, so wird der neue Dialog automatisch unterhalb des bereits angezeigten Dialogs positioniert.
The Dial button
Über den Wählbutton können Sie eine Ruf einleiten, einen Ruf annehmen oder ein Gespräch beenden.
The current state is indicated by the color (may flashing) and symbol:
The phone is free. Flashing green indicates an incoming call. The phone is in conversation state. The phone is in a special state: Call Forwarding or Do Not Disturb has been set or the TAPI device is "out of service" (not ready). Error condition: The TAPI device could not be opened. The PhoneDialog has no assigned TAPI device.
Enter the phone number directly
In the command line you can enter the number to be dialed directly. Press "Return" to start dialing. A second "Enter" ends the call.
For an incoming call the subscriber number is displayed but can not be edited.Post dial in the connection state: Digits/characters entered during a connected call are treated as DTMF post dial. There are DTMF tones generated that allow you to respond to "Announcement menus" such as "... press 1 for...".
Input via dial pad: Via dial pad, you can also enter a phone number with mouse click.
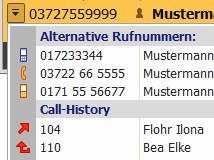
View menu for "Alternative phone numbers" and "Call History": If a contact is assigned to the currently displayed call and this contact has several phone numbers, they will be selectable by drop-down menu. The existence of alternative numbers is indicated with a "top line" over the drop-down arrow. The Call History displays a list of recent connections. If there are no menu entries, the button is disabled.
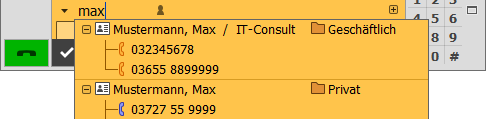
Contact search via input line
Search function: You can search in the input line for contacts that are registered in the phone book or speed dial. To specify which fields to be searched, you can customize the appropriate field filter via [Options > Telephony > Extended Settings > Search in these fields ...].
The search for a name starts automatically as you type. Wird eine Ziffernfolge eingegeben (Suche nach Rufnummer), muss anschließend die Taste "Cursor-Down" gedrückt werden, um die Suche zu starten. Gefundene Einträge werden in einer Popup-Trefferliste angezeigt.
In der Grundkonfiguration sind folgende Einstellungen vorgegeben:
- Nur Einträge mit Rufnummer in der Trefferliste anzeigen
- Trefferliste auf 40 Einträge begrenzen
- Suche während der Eingabe eines "Namens" automatisch starten.
- Am Wortanfang suchen
- Der Feldfilter enthält: Name, Vorname, Firma, Rufnummer (inkl. Mobil)
Diese Einstellungen können unter [Optionen > Telefonie > Erweiterte Einstellungen] angepasst werden.
Display of contact information
Contact information are the related information to a number (subscriber) such as name, first name and company. If a contact is found in the phonebook by phone number, the corresponding information can be displayed in the PhoneDialog. The contact info line is visible to the right of or above the input line (dependent on "Dialog-View").
Copy Contact information:
The contact info line has a context menu (right click), which allows you to copy the contact information and/or the phone number into clipboard.
Advanced display view
The "Extended Display View" allows to display call and contact information more clearly and completely. The display is enlarged and the row for the contact information is displayed above the input line.
The "Extended Display View" only affects the display in the "Standard" dialog view. It can be switch on/off via the [+][-] button in display or the context menu.
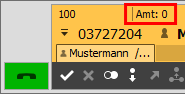
Outside Line Access Code
Via "Out" button you can set the outside line access code for external numbers.Configuration... The outside line code is automatically added when dialing. The numbers are therefore always to enter without an outside line code.
In the journal, the numbers are always displayed without outside line code. If the numbers are displayed with outside line code to you, the settings for an outside line code are probably not correct.
Call Forwarding and DND
Call forwarding
and DND
can be turned on/off via the context menu or the icon buttons. When setting the call forwarding a menu with speed dial keys is displayed as the destination for call forwarding. The first menu item allows the free entry of a destination number.
Hint: The buttons are only visible if call forward / DND is supported by the TAPI driver.
Other options for setting call forwarding/do not disturb:
- when setting a presence status via command line or using the "Edit Presence Status" dialog.
- automatically when the lock screen is activated. See [Options > TAPI Device]...
- via command line when calling a script file (e.g., batch, VBS). Such a script can be conveniently launched via a shortcut key or a desktop shortcut. In both cases, a system-wide hotkey can also be assigned.
Example of a batch script that can be used, for example, when taking a break:
# Set call forwarding (!Add program directory)
cti_client.exe /forward -cf=12345678
# Wait 10 seconds (Setting call forwarding may take a few seconds.)
timeout /t 10# Put PC into standby mode.
%windir%\system32\rundll32.exe powrprof.dll,SetSuspendState Standby
CallTabs
CallTabs represent a contact, an incoming call or an active call. The display and the buttons on the toolbar, refer to the currently active Tab. The tab supports drag and drop both as a source and as a target (e.g. Speed dial key <-> Tab, Phone book <-> Tab, Journal -> tab). Using the context menu you can add new tabs, or close unneeded tabs.
Show contact information on Tab: Starting with version 3.0.028, it is possible to display contact information on the CallTabs such as name and company or the phone number.
Configuration...
Toolbar
Tool buttons to control the TAPI functions:
For more information about TAPI functions ...
Functions: Hotkeys: Dial, Answer Call F4
Hang Up F5
Hold Call Ctrl+B
Pickup Ctrl+P
Setup Transfer Ctrl+R Redirect incoming or connected call Ctrl+F Transfer Call Ctrl+T Setup/complete conference
Redial: Ends the current call and starts the redial timer (30 sec). On timer elapsed event the number is dialed again automatically. Ctrl+Z Tool buttons for additional functions:
Functions: Hotkeys: Opens the "speed dial menu". Once selected, the number is dialed directly.
Ctrl+S Opens the contact in Outlook.
Shift+F2 Opens the contact in the phone book data mask.
Ctrl+F2 Displays the contact in the phone book tree.
Ctrl+G Opens a menu with contact-associated email addresses. After selecting the default email client is called.
Ctrl+E Allows you to set an appointment or call reminder. It displays a menu of choices.
Ctrl+D Interworking: The telephone number or any data field can be transferred to another application. It displays a menu of choices.
Ctrl+I
Keyboard navigation and hotkeys
Some functions of the PhoneDialog can be controlled using the keyboard as soon as the input line has the focus.
Functions: Hotkeys: Create new CallTab Ctrl+N Clean CallTab Ctrl+Backspace Close CallTab Ctrl+Del Next CallTab Ctrl+Right Previous CallTab Ctrl+Left First CallTab Ctrl+Pos1 Last CallTab Ctrl+End View menu for "Alternative phone numbers" and "Call History": Ctrl+Down Toggle advanced display view Ctrl+ + More global and local hot keys for telephony can be assigned under [Options > Customize > Hotkeys].
Problems with HighDPI scaling from Windows 10
When using multiple monitors with different DPI scaling, windows with no title bar, such as the Popup-PhoneDialog, the Appointment-alert or the Sidebar, my affected by display errors.Further information can be found here ...
Configuration / Assign TAPI Device
The The configuration of the PhoneDialog can be opend via main menu [Options > Telephony > PhoneStack> PhoneDialog] or via the context menu "Configuration".
On page "TAPI device" you can assign a TAPI device to the PhoneDialog.
Other settings that can be adjusted
- Dialog view (Small, Standard, Phone)
- Display and background color
- Hide/show dialpad
- Advanced display view